Monday, July 15, 2013

Bad-ass Barbie Glitter Gradient!

Long time, no post! Life has been hectic recently, preparing for University. Luckily, things have calmed down a bit so I should be posting more regularly for the next 2 weeks. I have a backlog of manis, along with a few more I'm planning to do before I make my final move to college. So let's get on to the nails!

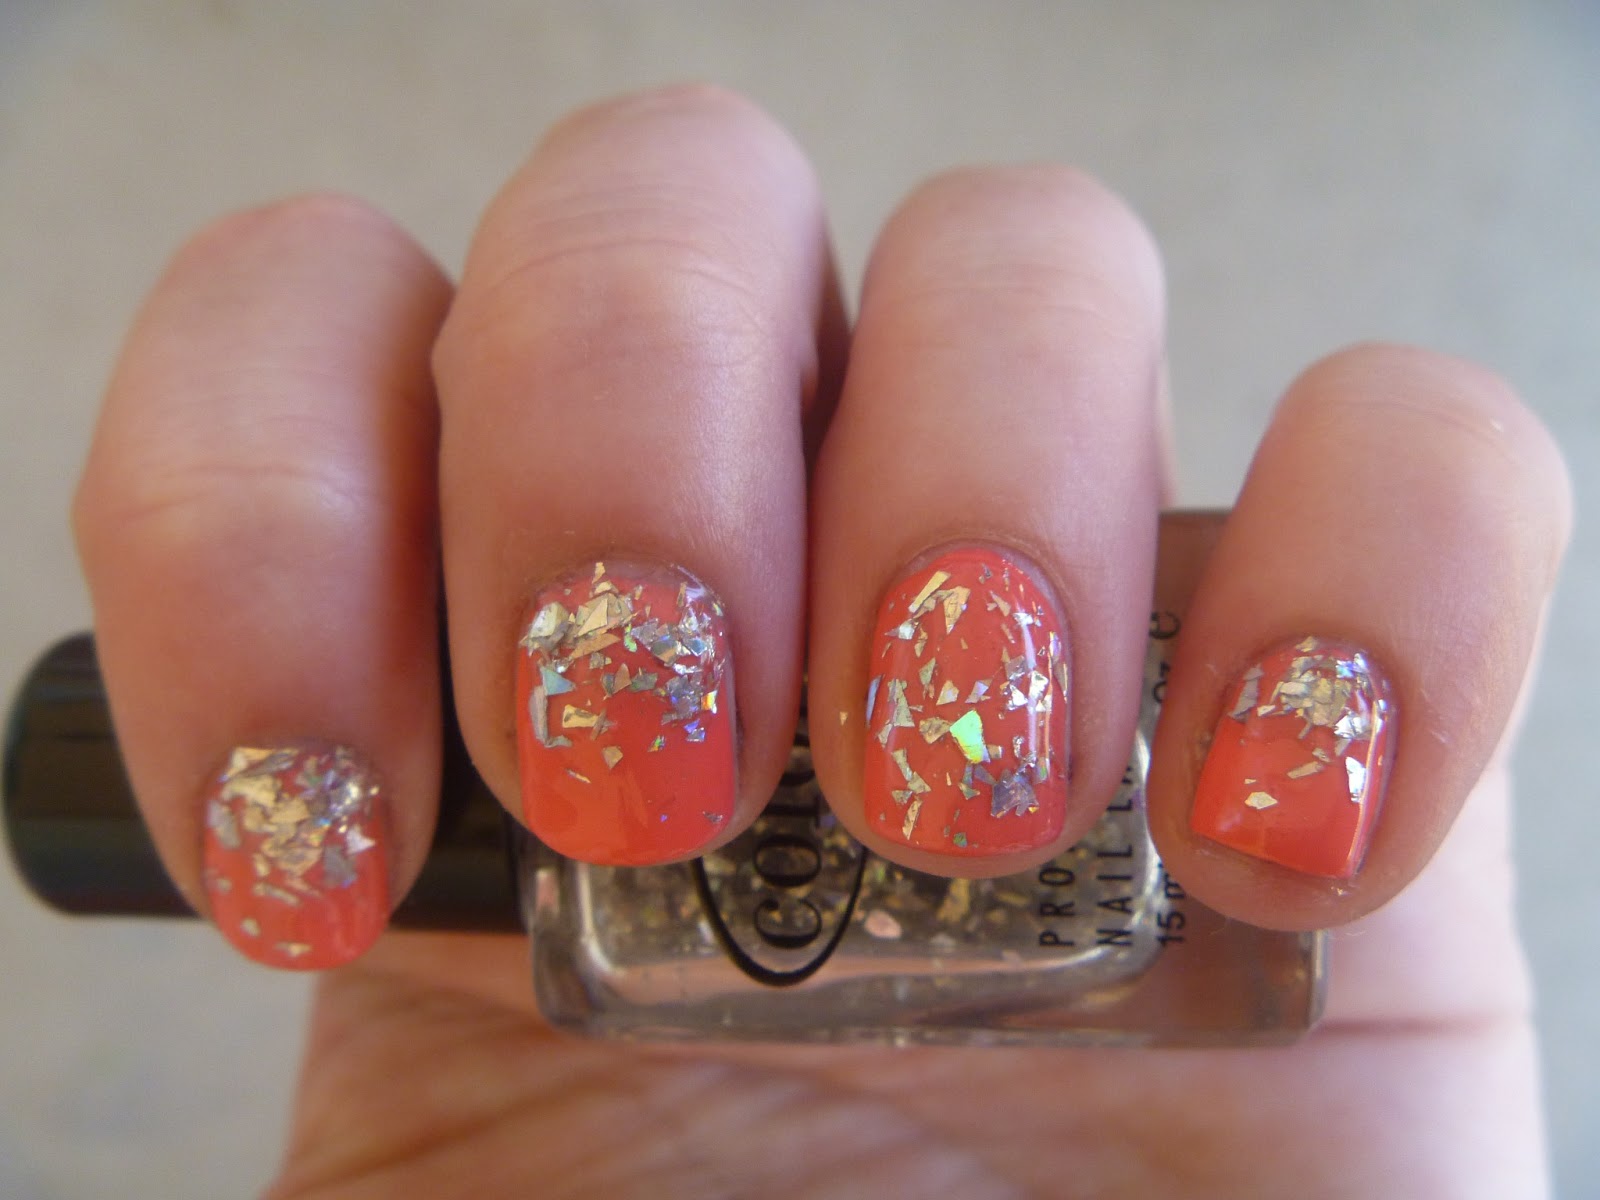
I recently started using OPI Nail Envy, and while I know you're supposed to initially keep bare nails over the Nail Envy, I couldn't stand having my nails sans-polish for more than 3 days and I broke down. Not only did I polish them, I went out and bought a new polish just for this purpose. No, the 150 bottles I already have wasn't good enough, I just HAD to go buy a new bottle. I have a problem OTL; anywho, the new polish was China Glaze Shocking Pink, and it is a scorcher. It doesn't look like it in the photos, but this is an eye-searing hot pink. Not too red, not too coral, I'm in love. It took 2 coats for opacity, but was a bit uneven-looking, so I added a third coat to smooth everything out. It went on well and didn't pool, and after a streaky first coat evened out well. It also dries very quickly- in 45 minutes start to finish I was able to paint a base coat, 3 coats of SP, put on socks and go workout without any quick dry top coat and without any smearing. I did a simple glitter gradient with China Glaze Glitz n' Pieces, and finished it off with Out The Door topcoat because I not only wanted to smooth out the glitter (this glitter lays nice and flat, but gradients can get a bit chunky), but like most neons, Shocking Pink dries matte. On to the pictures!


I absolutely love this combo- it satisfies the bad-ass rebel inside me while still being adorably girly. Plus, I definitely prefer this sparkly black-and-silver glitter mix over the coveted Hard Candy Black Tie Optional. Who doesn't love sparkly glitter?

All of these pictures were taken indoors in artificial light with no flash.


So, does this look like something hard-rock Barbie would enjoy? Do you have either of these polishes? What are some other glitters that Shocking Pink would pair well with? Thank you so so much for reading, and I look forward to our next pretty, easy, Real Girl Polish look!

Thursday, June 13, 2013

Astronomy: The study of celestial bodies (AKA Galaxy Nails!)

Hello, lovelies! I am one day late with this post, but as of yesterday I will be participating in "The Science of..." Themed Nail Art Challenge"! I am going to college in the fall to study Marine Biology and Zoology, and am a former AP Biology, AP Chemistry, and AP Physics student, so science has a very special place in my heart. The first challenge is astronomy, so the obvious choice is galaxy nails! This was my first attempt, and these were a lot harder than I thought they would be. They started off really well, and as I kept layering the colors got kind of muddled and no longer glowed. I think if I did these again I would layer a lot less, and stick to 2-3 colors per nail on top of the white, and maybe a darker outside color. But, here is the final result (all pictures were taken in the shade):
Left hand

Left hand

Left hand

Right hand
My favorite nail is my right thumb. The blues looked really celestial and that was the nail I layered the least. Sure, they're not the best, but now I know what to do next time! I had a lot of fun doing them, at least :) Maybe I'll pick up China Glaze Fairy Dust for my next attempt ;)

So, what do you think of galaxy nails? Have you tried them out? Do you have any tricks to make them turn out well? Thank you so much for reading, and I'm looking forward to our next fun, pretty, real girl polish look! :D

Monday, June 10, 2013

My first butter LONDON- Jack the Lad swatch and review!

Hello, hello! I am extremely excited to show all of you my first butter LONDON polish. I had a very long, difficult week, and I needed a little retail therapy. My collection is getting to a point where I'm looking for unique polishes, and this one did the trick. The polish is from their 2012 Holiday collection, which was full of fun glitters, including Fairy Cake which I may purchase soon and review for you. The polish today, however, is Jack the Lad. It is a dark green jelly base filled with mossy green, blue, and gold micro-flecks. Indoors it is a very shiny, glittery evergreen with a slight flash of blue in more direct light. In the sunlight, the glitter comes to life and the green and blue become very distinct and make a scaly, mermaid-y effect. The application was a dream- a little bit thick, but extremely easy to control. I used a slightly thick first coat and a thinner second coat to cover up and bald spots. My only complaint is how thin the brush is. It does not hold a lot of polish, so I had to keep re-loading the brush for my larger nails. But that's nitpicking. When dry, Jack the Lad has a very shiny, smooth finish and I only used topcoat to keep it from chipping. But enough talk- I'll let the pictures show you what a beautiful polish this is.
Note: Please excuse my jacked-up pointer finger. I had a nasty hangnail and my finger is still recovering :)
Shade

Shade

Sunlight

Sunlight

Sunlight

Sunlight
I bought this polish at ULTA for $15. It can also be found online and at any retailer that sells butter LONDON, like Macy's.


So, what do you think of this polish? Are you planning on purchasing it? Do you have it? Are there any dupes? Thank you so much for reading, and I look forward to our next beautiful, simple, real girl polish look!

Friday, June 7, 2013

Quick post!

Hello, lovelies :) I just have a quick post today. My dad had surgery, so it has been pretty hectic for me recently. I should be back soon- I have some comparisons (and possible dupes!) lined up, and some fun science designs. I will be participating in the "The Science of..." Themed Nail Art Challenge starting on June 12! The first inspiration is astronomy, the study of space and stars...galaxy nails, anyone? ;) Well, on to the nails! These are sort of old, probably 2 weeks ago, from when the Couture de Minnie collection first came out.
Direct sunlight

Shade
The colors I used are OPI French Quarter For Your Thoughts, OPI Minnie Style, and Wet n' Wild Ebony Hates Chris. Minnie Style is the shiny red and matte white glitter. The nails shown have 2 coats. I absolutely love this polish- I walked into Ulta with no intention to buy, and the instant I saw this polish I knew it had to be mine. There is no problem getting the glitter out of the bottle and it applied pretty well. I applied normally for the first coat and dabbed on the second coat, and it dried in a normal amount of time.

So, what do you think of this look? Do you have any of the new OPI Couture de Minnie polishes? What do you think of them? Thank you so much for reading, and I look forward to our next fun, easy, real girl polish look!

Saturday, June 1, 2013

Fun twist on vintage roses

Hello, hello :) today I bring you my version of the super-popular vintage roses!
In shade
In shade
In sunlight
In sunlight

The colors I used: 
Sally Hansen Hard As Nails Xtreme Wear in White On
Pure Ice in Electric!
Orly in Fancy Fuchsia
Orly in Green Apple
Out The Door topcoat
I also used a dotting tool, clear scotch tape, and craft scissors. 

So, what do you think of this look? Have you tried your hand at vintage roses? What special twist did you put on your own? Would you like a tutorial for this look? Thank you so much for reading, and I look forward to our next simple, fun, real girl polish look!


Thursday, May 30, 2013

The perfect summery coral? Swatch & glitter gradient!

Today I am giving you my first swatch & review! I think coral is such a pretty color that is perfect for summer. The pinky-orange contrasts perfectly with the blue water of the beach and swimming pools. There are tons of coral polishes out there, so I want to show you my favorite: Sally Hansen Hard as Nails Xtreme Wear in Coral Reef. It is a bright salmony pink-leaning-orange color with a sort of dusty quality. It photographed much more orange than it is in real life. The formula is lovely- a tiny bit thick but applies very easily without any problems. It dries in an average amount of time, about 5 minutes for each coat, and has a slightly shiny finish. The first coat looks a bit streaky but evens out very well with the second coat. I used 2 coats for my swatches.
In shade
In shade
In sunlight

You can buy this polish at Walgreens, CVS, Rite Aid, Target, Walmart, and anywhere that sells Sally Hansen nail polish. It costs between $2-$3, a lot cheaper than other popular coral colors like Essie Tart Deco. But, of course, I can't let a pretty polish go on its own. What better way to dress it up than a glitter gradient? I layered Color Club Diamond Drops- a shredded silver holographic glitter- over Coral Reef and finished it with Out The Door topcoat. Diamond Drops is from Color Club's Blossoming collection. On to the picture spam!
In shade
In shade
In sunlight
In sunlight
I love this mani- it's so bright and sparkly, and I get so distracted when the light hits the glitter and makes a bunch of rainbow colors!


So, have you tried Coral Reef? Do you have a favorite summer coral? What design should I do next? Thank you so much for reading, and I look forward to the next cute, easy, real girl polish look! ;)


Cartoon nails! (AKA Mega Fail)

Hello, again! Today I broke my left thumb nail during yoga, so I had to chop my whole month of work off. To try and cheer myself up, I attempted a look I have been loving for a long time- cartoon nails! This was really easy... up until I had to put the black freehand tip. Needless to say, I am terrible with nail stripers (I will choose a dotting tool over a striper any day). It was a fun to try something new, but I immediately removed it in favor of a much easier design. So, here is my attempt at cartoon nails!
As you can tell, I had a bit of trouble with the tips (especially the middle finger), but this is definitely a look I am willing to try again. Maybe when I have longer nails :) 

So, have you tried the cartoon nail look? Did you have trouble with the tips like me? Any suggestions to make this look better?

Wednesday, May 29, 2013

First post- leopard tutorial!

Hello lovelies! And so begins my polish blog. A bit about me first- I am a redditor-turned-lacquerista. I was browsing reddit one day and I came across Reddit Laqueristas. I instantly became (unhealthily) obsessed with nail polish and started to grow my nails, acquire more polishes, and improve my nail art skills. I am an artist, so I thought of nail polish as a whole new media to explore, and I absolutely love it. This blog will focus a lot on easy nail art tutorials and reviews of cheaper polishes (living that broke college student life ;) ). Thank you so much for reading and I look forward to lots of fun, pretty nails in the future! Let's get started!


Easy Leopard Print

In sunlight
In shade
This is the look I will show you how to do! Leopard print is such a fun summer design that is CRAZY easy to do. You can use the same colors for each nail, or alternate like I did here.
The polishes I used (from left to right):
Essie Grow Faster base coat, Nicole by OPI Look at Me Look at Me, Illamasqua Collide, Essie Butler Please, Rimmel 60 Seconds Hot Black to Go, inm Out The Door topcoat
Here are very similar colors for a much lower price: Sally Hansen Hard as Nails Xtreme Wear Celeb City, SH Xtreme Wear Pink Punch, Pure Ice French Kiss (SH Xtreme Wear Pacific Blue is an almost exact dupe for Butler Please, but I do not personally own it- French Kiss dries a good bit darker than it looks in the bottle)
The only tools you will need is something to hold the polish (plastic wrap, aluminum foil, and lids are cheap alternatives to a paint palate) and a dotting tool (bobby pins or the head of a sewing pin work just as well!)


On to the tutorial!

This is the look I will re-create on my swatch wheel:
To begin, paint the nail with 2 coats of your silver. I used Nicole by OPI Look at Me Look at Me.
Put a few drops of your pink onto your makeshift palate (I used Illamasqua Collide). Dip your dotting tool into the polish!
Make a few oval-shaped blobs on your nail. It's okay if they go off the nail! Try and tilt them in different directions to make it more realistic.
Sorry for the noob picture- Its hard to paint and take a picture with my left hand at the same time!
Now put your black polish onto your palate and load your dotting tool!

Next, add the outer part of the spots (I call them brackets). There are two types you can make- two small c-shapes around the short ends of the spot like parenthesis or one large c-shape around one long end of the spot. Here are the two different types:
The parenthesis style is on the bottom, and the large c-shape is on top.
Make brackets around all the spots, trying to alternate which style you use.
Finally, add small black dots in the empty spaces. This is what really brings the design together- it's subtle, but it makes a huge difference!
Voile! The last step is to cover your design in a topcoat of your choice to protect it. I went ahead and did the same steps with the cheaper polishes right next to the one I just showed you:
Nicole by OPI Look at Me Look at Me is pretty different from SH Xtreme Wear Celeb City, but you get almost the exact same look for a lot less- if you used the cheaper polishes I showed you instead of the ones I used, you would save about $26!

So, hopefully this tutorial was helpful to you! If you would like me to review any of the polishes I used let me know. Do you like this look? Have you tried leopard print before? Has this tutorial inspired you to try it? Let me know! Thank you so much for reading and I look forward to many more easy, pretty, real girl polish looks!